Our pop up doesn’t have a bathroom but we only plan to camp for now at places that have restrooms/showers facilities. But we wanted to be prepared with an easy and cheap “emergency” alternative if needed. I had read a lot about the bucket port a potty. I wasn’t sure if it would be easy to find a bucket that would fit the snap on toilet lid seat that I bought. I happen to have a brand new orange Home depot bucket and tried that. It fit like a charm. I didn’t like the color so I just painted it. Don’t you just love Rust-Oleum spray paint ? It covered very easily. I purchased replaceable bags for “emergency” usage and also plan on having kitty litter to absorb any smells or mess. This will be a great substitute if needed but easy enough to keep on hand and empty asap. Would you use this if you had to? I know we will if needed and it sure beats going out in the woods in the middle of the night!!!!! Have potty will travel!
-

- These can be free or very cheap at your local hardware stoere
-

- I ordered this online from Amazon but these can be found at local sports stores (Academy)
-

- Keeping plenty of disposable bags on hand
-

- A few coats of primer/paint covered it up very well.
-

- It all snapped together perfectly.
-
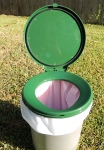
- Ready for action!